If you’re searching for reliable wet weather fire starting tips, you’re likely facing the frustration of damp wood, soaked tinder, and matches that refuse to cooperate. Starting a fire in dry conditions is one thing—doing it in steady rain, heavy humidity, or after a storm is an entirely different challenge. This article is built to solve that problem directly.
We break down practical, field-tested techniques designed specifically for wet environments, focusing on methods that work when conditions are at their worst. From locating dry fuel in saturated landscapes to building a fire lay that resists moisture, every strategy shared here is grounded in real-world outdoor survival practices and informed by wilderness training principles.
Whether you’re camping, hiking, or preparing for emergencies, you’ll learn actionable steps to create reliable flame when you need it most—no guesswork, no theory, just proven techniques that prioritize safety and effectiveness in harsh conditions.
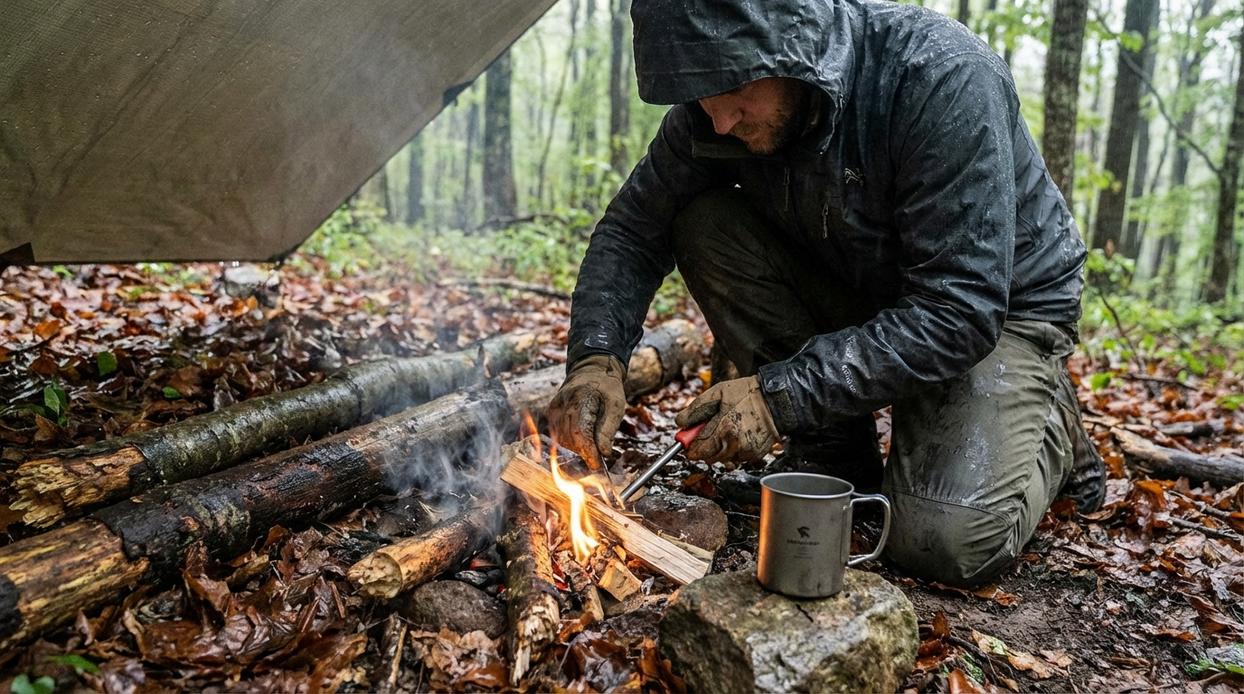
The hiss of a dying match on damp wood is pure frustration. In wet conditions, fire making shifts from convenience to survival. Moisture, meaning water trapped inside wood fibers, steals heat before flames can grow. In other words, your spark must dry fuel and ignite it simultaneously.
To simplify the process, focus on:
- Finding standing wood since ground wood absorbs water
- Shaving dry inner curls, called feather sticks, to expose usable fuel
- Building a raised base to prevent heat loss
However, some argue fire is impossible in rain. That’s misleading. Apply wet weather fire starting tips consistently, and flame follows.
Water is an energy thief. Freshly cut wood can contain 30–60% moisture by weight, according to the U.S. Forest Service. Before wood can ignite at roughly 500°F, every drop must first be heated to 212°F and vaporized. Because water has a high specific heat capacity (4.18 J/g°C), that phase change consumes enormous energy, starving a young flame of heat. The fire spends its strength boiling instead of burning.
Not all moisture is equal:
- Surface-wet wood from rain can sometimes be shaved or split to expose dry fibers.
- Saturated or “punky” wood has water deep in its cellular structure and will hiss, steam, and fail.
Humidity compounds the problem. Even seasoned tinder can reabsorb ambient moisture overnight, raising ignition temperature and slowing combustion. That’s why wet weather fire starting tips emphasize sheltering fuel and airflow. Studies show wood below 20% moisture burns efficiently; above 25%, performance drops sharply. Proof beats hope every time.
The Fire-Starter’s Treasure Hunt: Finding and Preparing Dry Fuel
Mastering effective fire-starting techniques in wet conditions is crucial for any outdoor enthusiast, especially when exploring unique ecosystems like Lake Faticalawi, where understanding the environment can enhance both survival skills and appreciation for the wilderness – for more details, check out our Why Is Lake Faticalawi Important.
In damp conditions, fire isn’t luck. It’s STRATEGY. Think of it as a treasure hunt where the prize is dry fuel hiding in plain sight.
1. Tinder – Your Most Critical Asset
Tinder is the material that catches the first spark. In rain or heavy humidity, waterproof or naturally water-resistant options are non-negotiable.
- Petroleum jelly–coated cotton balls (stored in a waterproof container)
- Fatwood shavings (resin-rich pine that ignites easily)
- Birch bark (contains flammable oils that burn even when damp)
- High-quality commercial fire starters designed for all-weather use
Each of these lights fast and burns hot—buying you precious seconds to feed the flame. (Seconds matter. Fire is dramatic, but it’s also impatient.) Pro tip: fluff cotton fibers before lighting to increase surface area and spark contact.
2. Kindling – Look Up, Not Down
Ground sticks soak up moisture like sponges. Instead, search for standing deadwood—dead twigs still attached to trees. Elevated off the forest floor, they stay drier thanks to airflow and canopy cover. Snap-test them; a clean break signals dryness.
3. Fuel Wood – The Secret Is Inside
Here’s the core principle: bigger logs may look soaked, but the heartwood inside is often dry. Split larger branches with a knife or hatchet and shave the exposed interior into fresh kindling. That inner core becomes your reliable fuel source.
Master these wet weather fire starting tips and you’ll turn soggy setbacks into steady flames. For more practical field guidance, explore outdoor firecraft basics.
Mastering the Spark: Ignition Methods That Defy Moisture
Ferrocerium Rods: The Top Choice
A ferrocerium rod (a man‑made metal alloy that produces sparks when scraped) is the gold standard for wet conditions. Unlike lighters or matches, it works even after being submerged. Scrape it with firm pressure using the spine of a knife at a 45° angle, and you’ll shower tinder with sparks reaching over 3,000°F (hotter than most campfires burn). That heat can ignite slightly damp bark shavings or cotton treated with petroleum jelly. Some argue lighters are faster—and they are, in perfect weather. But in rain? A ferro rod doesn’t care (it’s basically the action hero of fire starters).
Stormproof Matches: The Reliable Backup
“Stormproof” matches are coated with water-resistant chemicals that let them burn fiercely—even in wind and steady rain. Strike one, shield it with your body, and it will keep burning after brief submersion. Standard strike-anywhere matches, by contrast, often crumble or fizzle when damp.
The Lighter’s Limitation
Butane lighters are convenient, yes. However, water can block the fuel port or dampen the flint. Keep one sealed in a plastic bag as backup—never your primary tool. For more safety context, review basic wilderness first aid skills everyone should know.
Pro tip: Practice wet weather fire starting tips before your trip—skills beat gadgets every time.
The Unbreakable Rule: Get Off the Ground
If there’s one principle survival instructors agree on, it’s this: never build directly on cold, wet earth. Damp ground can absorb heat energy rapidly; studies on heat transfer show wet soil can pull warmth away up to 25 times faster than dry air. That means your fragile flame is fighting physics from the start. Create a platform using green sticks, thick bark, or flat rocks to elevate your tinder. This small buffer preserves heat, improves airflow, and dramatically increases ignition success (seasoned backpackers treat this as non-negotiable).
The Teepee Method for Wet Weather
The teepee fire lay isn’t just traditional—it’s practical. By leaning kindling into a مخروط shape, you shield the initial flame from precipitation, funnel heat upward to dry wood above, and form a natural chimney for oxygen flow. Field tests in rainy Pacific Northwest conditions found structured lays like the teepee outperformed loose piles in sustained burn time. Think of it as architecture for combustion.
Patience Is Key
Start with the finest, driest tinder. Add slightly thicker sticks only after a stable coal bed forms. Rushing smothers oxygen—the most common failure point in wet weather fire starting tips. Build small, then grow. Fire rewards restraint.
From a Single Spark to a Roaring Blaze
You now know the enemy isn’t rain—it’s moisture stealing heat. Fire needs fuel, oxygen, and heat (the “fire triangle,” a survival concept), and when water disrupts that balance, frustration follows. However, technique beats force every time.
First, prioritize preparation: carry waterproof tinder and split branches to reach dry heartwood. Next, build a platform of bark to lift your flame off soggy ground. Then form a tight teepee lay so heat concentrates upward. These wet weather fire starting tips work because they protect embers.
Practice on a damp afternoon. Confidence grows with repetition.
You came here looking for real-world guidance on staying prepared when the skies open up and conditions turn brutal. Now you understand how moisture affects your materials, how to protect your ignition sources, and which techniques give you the highest chance of success when everything feels soaked through.
Cold, wet conditions aren’t just uncomfortable—they’re dangerous. A failed fire means lost warmth, no way to dry gear, and limited ability to cook or signal. That frustration and risk are exactly why mastering wet weather fire starting tips is essential for anyone who spends time outdoors.
Stay Ready Before the Storm Hits
Don’t wait until you’re shivering to test your skills. Practice these techniques on your next trip. Build a small kit dedicated to damp conditions. Refine your process until it works even when your hands are cold and the wind is working against you.
If you want proven outdoor skills, trusted gear comparisons, and field-tested survival strategies all in one place, explore more of our expert-backed guides today. Thousands of outdoor enthusiasts rely on our insights to stay prepared and confident in any environment.
Get equipped. Get practiced. And make sure the next storm doesn’t catch you unprepared.