A slip on a wet rock. A hard fall on uneven ground. A wrong turn that leaves you miles from the nearest road. In the wilderness, there is no ambulance en route—you are the first responder. Standard first aid assumes help is minutes away, but backcountry emergencies demand a different mindset rooted in stabilization, improvisation, and environmental awareness. This guide goes beyond basic wilderness first aid skills to give you a practical framework for handling serious injuries, assessing risks, and making critical decisions when rescue is uncertain and self-reliance is your strongest lifeline.
The Patient Assessment System: A 60-Second Lifesaver
In an emergency, panic is contagious. Structure is calming. That’s exactly what the Patient Assessment System provides: a clear, repeatable plan that turns chaos into action.
First, Stop and Assess. Before touching the patient, scan for danger—rockfalls, aggressive wildlife, unstable terrain. This step protects you, because adding another victim never helps (and yes, it happens more often than you’d think). Your safety is the first benefit: you can’t rescue anyone if you’re injured.
Next comes the Primary Survey (DR. ABC)—a systematic way to catch life threats fast.
- Danger: Is it safe to enter?
- Response: Are they conscious? Do they react to voice or touch?
- Airway: Open and clear? Use a head-tilt/chin-lift if needed.
- Breathing: Look, listen, and feel for 10 seconds.
- Circulation: Check for a pulse and perform a blood sweep for severe bleeding.
Because this method prioritizes what kills fastest—airway blockage, breathing failure, massive bleeding—you avoid getting distracted by a dramatic but less critical injury (like a broken arm).
With basic wilderness first aid skills, this 60-second system boosts confidence, sharpens focus, and dramatically improves survival odds. And if you’re deep in the backcountry, pairing this with strong navigation skills—like these navigation without a compass natural direction tips—keeps small mistakes from becoming life-threatening emergencies.
Controlling Severe Bleeding: Direct Pressure and Beyond
Uncontrolled hemorrhage is a leading cause of preventable death outdoors (CDC). In other words, minutes matter.
First, apply firm, direct pressure with sterile gauze, a bandana, or any clean cloth. Press hard and steadily. If blood soaks through, do not peel it away; instead, layer more material on top to maintain clot formation. This simple feature—continuous compression—physically squeezes damaged vessels closed, buying precious time.
Next, elevate an injured limb above heart level. While some debate how much elevation alone helps, pairing it with pressure can reduce blood flow enough to slow visible bleeding (think of a slightly kinked garden hose).
For deep, gaping wounds, wound packing becomes critical. Using basic wilderness first aid skills, push gauze or cloth firmly into the cavity until it is completely filled, then resume strong pressure. The detail matters: tight packing targets the bleeding source rather than just the surface.
Consider a tourniquet only for catastrophic limb bleeds that will not stop. Applied 2–3 inches above the wound and tightened until bleeding stops, it can save a life—though some argue it risks limb damage. Modern data shows properly used tourniquets are far safer than once believed (Stop the Bleed). Note the time clearly.
- Apply pressure immediately
- Elevate when possible
- Pack deep wounds tightly
- Use tourniquets decisively
(Pro tip: hesitation costs more than over-preparation.)
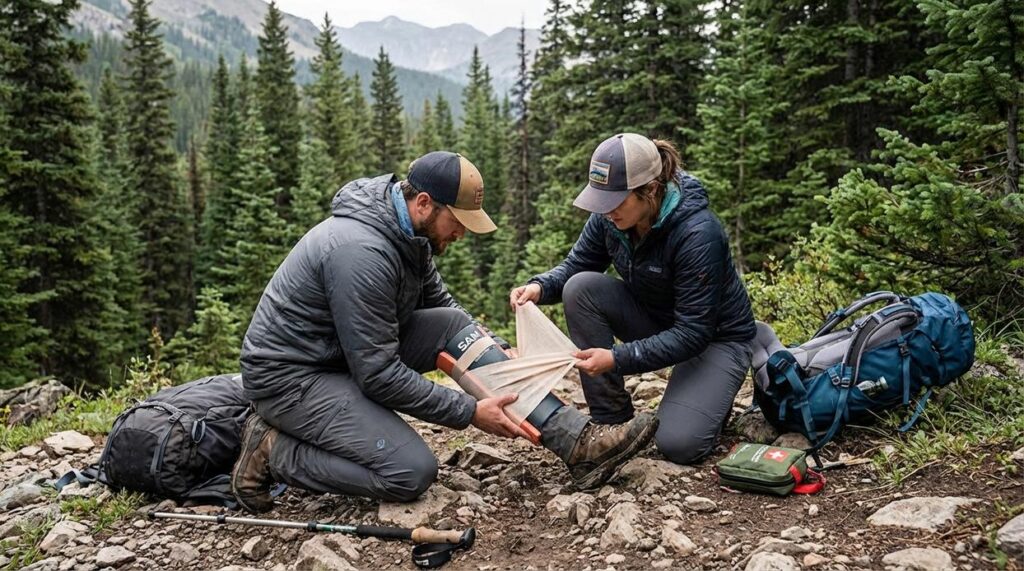
Immobilizing Injuries: How to Build a Wilderness Splint
I once watched a hiking partner misjudge a slick patch of granite and land hard on his forearm. The sound alone told us this wasn’t “walk it off” territory. Out there, miles from the trailhead, splinting wasn’t optional—it was ESSENTIAL.
The goal of splinting is simple: prevent further injury, reduce pain, and control swelling by immobilizing a suspected fracture or severe sprain. Think of it as hitting the pause button on damage (because the wilderness doesn’t come with an ER waiting room).
Start with what you have. Trekking poles are ideal. Sturdy sticks work. A rolled-up sleeping pad can mold around a leg. In a pinch, even a well-meaning friend’s arm can help stabilize things. Wilderness medicine rewards creativity.
Follow the “Two-Joint” Rule: immobilize the joints above and below the injury. If it’s a forearm fracture, secure both the wrist and elbow. Skip this, and the bones can still shift—painfully.
Padding and Securing matters more than people think. Use spare clothing to cushion the area and prevent pressure sores. Then tie it snugly with bandanas, cordage, or medical tape—but not so tight that circulation is compromised. Always check CSM—Circulation, Sensation, Motion—in the fingers or toes afterward.
Pro tip: recheck every 15 minutes as swelling increases.
Basic wilderness first aid skills can turn panic into a plan.
- Improvise with available gear.
- Reassess often.
Is it perfect? No. But it can make the difference between a manageable evacuation and a worsening emergency.
Managing the Environment: Hypothermia and Dehydration
First things first: hypothermia is more than dramatic shivering like you’re auditioning for a survival reality show. Watch for the “umbles”—stumbles, mumbles, fumbles, and grumbles. When someone starts dropping gear, slurring words, and complaining about everything (even more than usual), that’s moderate to severe hypothermia.
So what next?
- Get them out of wind and rain.
- Remove wet clothing and replace with dry layers.
- Insulate them from the cold ground.
- If conscious, give warm, sugary drinks.
Use basic wilderness first aid skills and act calmly but quickly.
Meanwhile, dehydration and heat exhaustion sneak up quietly. Headache, nausea, and dark urine are early clues. In that case, find shade, rest, and sip electrolyte-rich water. Never gulp—your stomach may rebel (and nobody wants that scene on the trail).
Ultimately, prevention wins: layer smart, hydrate often, and listen to your body before it files a formal complaint.
Your Responsibility on the Trail
You set out to learn how to handle emergencies in the backcountry—and now you have the framework to assess a patient, control bleeding, splint injuries, and manage environmental threats. These basic wilderness first aid skills are your safety net when things go wrong.
But the real takeaway is preparation. Emergencies become life-threatening when hikers are caught off guard, underprepared, or unsure what to do next. Knowledge without practice fades. Gear without training fails.
If you want real confidence on the trail, take the next step: practice these skills regularly and enroll in a certified Wilderness First Aid (WFA) course. Don’t wait for a crisis to test you. Build the competence now so you can protect yourself and others when it matters most.